Category Archives: 23-parametricobject

Yeliz Karadayi

10 Feb 2015

bracelet

Capturegs1

Alex Fischer is a Computation Design student who is developing an agent based modeling plugin for Grasshopper. He asked me to test an early version of the plugin to get an idea of how it can be used; I decided this project is a great opportunity to do it. I tried to make a necklace designed by two flocking systems trapped in the bounds of a shape that the user can parametrically set. The user can also set the behaviors of the agents in the flock, so they have a level of attraction, alignment, and repellent to their own flock systems, as well as complete avoidance of other systems. This project and the gif were the most fun.

Failures doing this project were, like the gif project, due to incompleteness of the library, but the limitations made it even more interesting to me. With low-level rules a great complexity is still visible.

I know these SHOULD print, because the person who wrote the script had printed out some test models that were output in the same manner as mine were. However this is yet to be tested later today.

Grasshopper Script

Ron

10 Feb 2015

A customizable candlestick by @ronaldhkim.

I found this assignment to be challenging, particularly regarding naked edges that I couldn’t resolve easily as well as other 3D printable constraints. This was my first time to use Rhino/Python; in the end, I chose to create a candlestick holder accommodating different heights and widths, as well as an adjustable base height. The base is smooth and contoured, while the stem is textured with individual spheres packed together. The socket sits above the stem with a candle modeled in the object. I would liked to have created an object with more interesting contours with finer 3D details, but I could this to be more challenging than expected.

import math
import rhinoscriptsyntax as rs
pi = math.pi
LayerRotation = 0.0

#height of column
#height = 25.0
height = rs.GetReal("Enter column height (between 5 and 30)", 15, 5, 30)
#radius of column
#radius = 5.0
radius = rs.GetReal("Enter column radius (between 2 and 10)", 2, 2, 10)
spheresize = radius / 10
#spacing of spheres in circle
spacing1 = pi/30
spacing2 = spacing1*2

#height of base
#base = 8.75
base = rs.GetReal("Enter height of stand (between 5 and 10)", 8.75, 5, 10)
list_of_points = [(radius + 5, 0, 0), (radius + 2.22, 0, 2.5), (radius + 7.08, 0, 4.5), (radius + 4.7, 0, 7.5), (radius, 0, base)]

rs.EnableRedraw(False)

baseCurve = rs.AddCurve(list_of_points)
rs.AddRevSrf(baseCurve,((0,0,0), (0,0,1)))

for z in rs.frange(base, height+base, spheresize):
LayerRotation = LayerRotation + spacing1
for theta in rs.frange(0.0, 2*pi, spacing2):
x = radius * math.cos(theta + LayerRotation)
#print("The value of x is ", x)
y = radius * math.sin(theta + LayerRotation)
#print("The value of y is ", y)
mySphere = rs.AddSphere([x,y,z], spheresize)

nextheight = height+radius

candle_base = [(radius, 0, height+base), (radius, 0, height+base+2), (radius+3.63, 0, height+base+2), (radius+3.63, 0, height+base+4), (0,0,height+base+4)]
candleBaseCurve = rs.AddCurve(candle_base)
rs.AddRevSrf(candleBaseCurve,((0,0,0),(0,0,1)))

candleHeight = 15
topSleeve = rs.AddCylinder((0,0,height+base+4), candleHeight, radius)

flame = [(0,0,height+base+4+candleHeight), (1.78,0,height+base+4+candleHeight+2), (2,0,height+base+4+candleHeight+3),(0.71,0,height+base+4+candleHeight+4),(0,0,height+base+4+candleHeight+6)]
flameCurve = rs.AddCurve(flame)
rs.AddRevSrf(flameCurve,((0,0,0),(0,0,1)))

rs.EnableRedraw(True)

GitHub Link: https://github.com/ronkim/homework23

I cannot embed the SketchFab code in here correctly; the link is here.


ST

10 Feb 2015

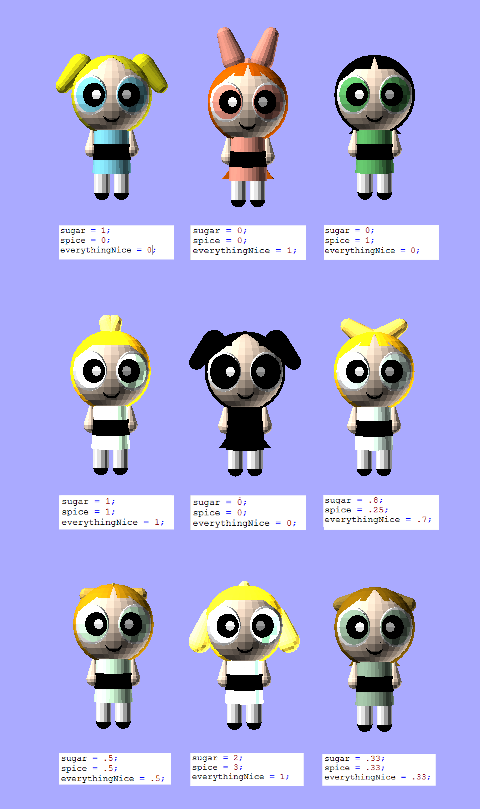
Parametric Powerpuffs by . Customize powerpuffs with sugar, spice, and everything nice

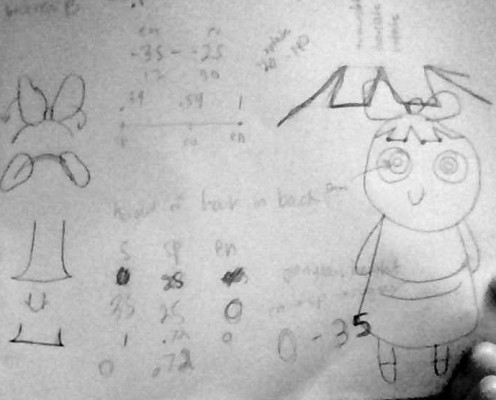
I came across the idea to make parametric power puff girls when I was reciting the formula. Sugar, spice, and everything nice (chemical x not included). I started thinking about changing those three variables to get all of the girls in between blossom, bubbles, and buttercup.

WIN_20150210_060847

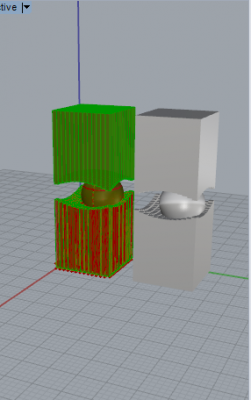
It was certainly a challenge to figure out what parts could be reused in each of the girls. I started by modeling buttercup, and then the others, to get my initial bounds and positioning.

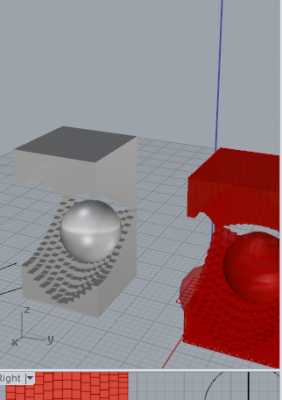
Overall, I am very pleased with the result. At each stage, the girls are different. It is really fun to play with and even plugging in numbers outside of the suggested range (0-1) yields interesting results.

PowerpuffGirlssmall

Unfortunately, OpenSCAD will not export my files to .STI because “the object isn’t a valid 2-manifold :(

Here is the code, which is also on GitHub:

////////// YOU SET THESE //////////
////////// FROM 0-1 /////////////
sugar = 1;
spice = 1;
everythingNice = 1;

///////////////////////////////

red = 1*everythingNice+.39*spice+.54*sugar;
green = .64*everythingNice+.76*spice+.91*sugar;
blue = .56*everythingNice+.42*spice+1*sugar;

hairRed = .98*everythingNice+.0*spice+1*sugar;
hairGreen = .42*everythingNice+.0*spice+.98*sugar;
hairBlue = 0*everythingNice+.0*spice+.1*sugar;

bowRed = 1*everythingNice+1*sugar;
bowGreen = .64*everythingNice+.98*sugar;
bowBlue = .56*everythingNice+.1*sugar;

ponytailHeight = (spice*.5+sugar*1+everythingNice*0)*40;
//////////// Dress ////////////////
 color([red, green, blue]) cylinder(h = 40, r1 = 8, r2 = 10);

//////////// Belt ////////////////
translate([0, 0, 25])
  color([0,0,0]) cylinder(h =8, r1 =9.8, r2 = 9.8);

///////////// Head ///////////////
color([1, .90, .81])sphere (r = 20);

//////////// Legs //////////////// 
translate([0, 5, 30])
 color([1, 1, 1]) cylinder(h =20, r1 =4 , r2 = 4);

translate([0, -5, 30])
  color([1, 1, 1])cylinder(h =20, r1 =4 , r2 = 4);

///////////// Feet ///////////////
translate([0, -5, 50])
  color ([0,0,0])sphere (r = 4);

translate([0, 5, 50])
  color ([0,0,0])sphere (r = 4);

//////////// Arms //////////////// 
translate([0, 10, 18])
color([1, .90, .81])cylinder(h =10, r1 =1 , r2 = 4);

translate([0, -10, 18])
color([1, .90, .81])cylinder(h =10, r1 =1 , r2 = 4);

translate([0, 10, 28])
color([1, .90, .81])sphere (r = 4);

translate([0, -10, 28])
color([1, .90, .81])sphere (r = 4);


// Mouth ////////////

intersection() 
{
color([0,0,0])  sphere (r = 23);
difference(){
translate([13, 0, 8])
  color([0,0,0]) sphere(r = 6);
translate([15, 0, 8])
  color([0,0,0]) sphere(r = 5);
}}


/////////// Eyes /////////////////
intersection() {
color([1,1,1])  sphere (r = 21.5);
translate([15, 11, 0])
  color([1,1,1]) sphere(r = 10);
}
intersection() {
color([1,1,1])  sphere (r = 21.5);
translate([15, -11, 0])
  color([1,1,1]) sphere(r = 10);
}


color([red, green, blue]){
intersection() {
 sphere (r = 22);
translate([19, 11.5, 0])
 sphere(r = 9);
}
intersection() {
 sphere (r = 22);
translate([19, -11.5, 0])
 sphere(r = 9);
}
}

intersection() {
color([0,0,0])  sphere (r = 23);
translate([19, 8.5, 0])
  color([0,0,0]) sphere(r = 6);
}
intersection() {
color([0,0,0])  sphere (r = 23);
translate([19, -8.5, 0])
  color([0,0,0]) sphere(r = 6);
}

intersection() {
color([1,1,1])  sphere (r = 24);
translate([21, 7, 0])
  color([0,0,0]) sphere(r = 3);
}
intersection() {
color([1,1,1])  sphere (r = 24);
translate([21, -7, 0])
  color([0,0,0]) sphere(r = 3);
}


////////// Hair ///////////////

color([hairRed, hairGreen, hairBlue])intersection() {
translate([-2, 0, 0])
  sphere (r = 21);
translate([-3, 0, 0])
  sphere (r = 21);
}

// bangs
module leftBangs()
{
 // left bubbles
 polygon([[5,20],[21,21],[20,0]], convexity = N);

 // blossom/buttercups
 polygon([[13,7+2.5*spice],[20,5],[20,0], [13,10-(8*everythingNice+8*spice)]], convexity = N);

}

module rightBangs()
{
 // left bubbles
polygon([[5,-20],[21,-21],[20,0]], convexity = N);

 // blossom/buttercups
 polygon([[13,-7-2.5*spice],[20,-5],[20,0], [13, -10+(8*everythingNice+8*spice)]], convexity = N);

}


intersection(){
translate([0, 0, 0])
color([hairRed, hairGreen, hairBlue])sphere (r = 21);
rotate(a=90, v=[0,1,0]) { 
color([hairRed, hairGreen, hairBlue])linear_extrude(height = 20) rightBangs();
}
}

intersection(){
translate([0, 0, 0])
  color([hairRed, hairGreen, hairBlue])sphere (r = 21);
rotate(a=90, v=[0,1,0]) { 
color([hairRed, hairGreen, hairBlue])linear_extrude(height = 20) leftBangs();
}
}


///////// Ponytail/ Buttercup stuff //////

module ponyTail()
{
polygon([[-19,20],[-19,-20],[-10,-20], [-10,20]], convexity = N);
}

color([hairRed, hairGreen, hairBlue]){

difference(){
color([.98, .49, 0])linear_extrude(height = 45) ponyTail();

translate([-20, -35., 19-ponytailHeight])
rotate(a=90, v=[0,1,0]) {
color([.98, .49, 0])cylinder(h =20, r1 =30, r2 = 30);
}

translate([-20, 35., 19-ponytailHeight])
rotate(a=90, v=[0,1,0]) {
color([.98, .49, 0])cylinder(h =20, r1 =30, r2 = 30);
}


translate([-25, 30, 65])
rotate(a=180, v=[1,0,0]) {
color([.98, .49, 0])cube([20, 60, (25+ponytailHeight)]);
// hair grows, last value ~20-40
}


}

}


//////////// Bow ///////////////

color([bowRed, bowGreen, bowBlue]){
translate([0, 0, -5-30*everythingNice]){

translate([0, -25+13*everythingNice+10*spice, 10*spice]){
rotate(a=-140+120*everythingNice, v=[1,0,0]) {
  cylinder(h =13, r1 =4 , r2 = 6);
   sphere (r = 4);
  translate([0, 0, 14]) color([1, .34, .26])sphere (r = 6);
}
}

translate([0, 25-13*everythingNice-10*spice, 10*spice]){
rotate(a=140-120*everythingNice, v=[1,0,0]) {
  cylinder(h =13, r1 =4 , r2 = 6);
   color([1, .34, .26])sphere (r = 4);
  translate([0, 0, 14]) sphere (r = 6);
}
}
}
translate([0, 0, -20])
sphere(3*everythingNice);
}


JohnMars—ParametricObject

CityGrabber by @john_a_mars extracts meshes from Nokia Maps

Last year, I was introduced to migurski/NokiaWebGL via Clement Valla’s 3d-maps-minus–3d. NokiaWebGL is a Python module that extracts the 3D tiles, i.e., buildings, textures, and terrains, from Here.com née Nokia Maps. Using chaosct/ofxPython, I was able to implement that module in openFrameworks.

I modified migurski’s existing code slightly to better utilize the WaveFront OBJ spec (they were creating multiple OBJs and simply downloading the JPEG textures; I refactored the code to combine all the meshes into a single file, as well as create MTL files that linked the textures). In order to display the OBJs in OF, I used the built-in ofxAssimpModelViewer, but had to update it to this fix (which is currently in the master branch, but not on 0.8.4).

At its current stage, the objects created by the app are not printable; they’re simply two-sided surfaces. My next step is to devise a way to create a parametric base in the OBJ, by somehow determining the edges of the model extruding them downward. My end goal is to make a website that will automatically generate these objects and ship them off to Shapeways to print. For that, I’ll need to find a way to embed OF on a server, and come up with an effective front-end GUI.

The project’s ofApp.cpp:

#include "ofApp.h"

//--------------------------------------------------------------
void ofApp::setup(){

    ofDisableArbTex();
    ofEnableBlendMode(OF_BLENDMODE_ALPHA);
    glShadeModel(GL_SMOOTH);

    python.init();
    python.executeScript("sandbox.py");
    
    ofxPythonObject myApp = python.getObject("MyApp");
    
    float lat = 40.709620;
    float lon = -74.009086;
    float zoom = 19;
    
    if (myApp) {
        python_program = myApp();
    }
    if (python_program) {
        python_program.attr("lat") = python.evalString(ofToString(lat));
        python_program.attr("lon") = python.evalString(ofToString(lon));
        python_program.attr("zoom") = python.evalString(ofToString(zoom));
        
        python_program.method("go");
        
        model.loadModel("objs/LAT" + ofToString((int)lat) + "_LON" + ofToString((int)lon) + "_Z" + ofToString((int)zoom) + ".obj");
        
        for (int i = 0; i < model.getNumMeshes(); i++) {
            model.getMesh(i).getVertices();
        }
        
        base.set(model.getSceneMax().x - model.getSceneMin().x, model.getSceneMax().y - model.getSceneMin().y);
    }
    
    cam.setDistance(1000);
}

//--------------------------------------------------------------
void ofApp::update(){

}

//--------------------------------------------------------------
void ofApp::draw(){

    ofSetColor(255);
    
    ofEnableDepthTest();
    ofEnableSeparateSpecularLight();
    ofEnableLighting();
    light.enable();
    light.setDirectional();
    light.setOrientation(ofVec3f(45, 90));
    
    cam.begin();

    model.setPosition(model.getSceneCenter().x, model.getSceneCenter().y, 0);
    model.drawFaces();

    
    cam.end();
    
    light.disable();
    ofDisableLighting();
    ofDisableSeparateSpecularLight();
    ofDisableDepthTest();

}

A little snippet of the python code

class MyApp(object):

    def __init__(self):
        pass

    def go(self):

        self.p = get_projection()

        print self.lat, self.lon, self.zoom

        self.loc = Location(self.lat, self.lon)

        self.coord = self.p.locationCoordinate(self.loc).zoomTo(self.zoom)

        self.textures = get_tile_data(self.coord)

        #
        # Output .obj files and JPEGs locally.
        #

        if os.path.exists('../../../data/objs/LAT%d_LON%d_Z%d.obj' % (self.lat, self.lon, self.zoom)) == False:

            obj = open('../../../data/objs/LAT%d_LON%d_Z%d.obj' % (self.lat, self.lon, self.zoom), 'w')
            obj.write('o LAT%d_LON%d_Z%d\n' % (self.lat, self.lon, self.zoom))
            obj.write('\nmtllib LAT%d_LON%d_Z%d.mtl\n' % (self.lat, self.lon, self.zoom))

            mtl = open('../../../data/objs/LAT%d_LON%d_Z%d.mtl' % (self.lat, self.lon, self.zoom), 'w')

            lastnumvert = 1
            for (i, (vertices, faces, image_url)) in enumerate(self.textures):

                obj.write('\ng mesh%d =====================\n' % (i))
                obj.write('usemtl mtl%d' % (i))

                obj.write("\n# List of vertices (x y z)\n")
                for (x, y, z, u, v) in vertices:
                    obj.write('v %.1f %.1f %.1f\n' % (x, y, z))

                obj.write("\n\n# List of texture coordinates (u v)\n")
                for (x, y, z, u, v) in vertices:
                    obj.write('vt %.6f %.6f\n' % (u, v))

                obj.write("\n\n# List of face definitions\n")
                for (v0, v1, v2) in faces:
                    obj.write('f %d/%d %d/%d %d/%d\n' % (v0+lastnumvert, v0+lastnumvert, v1+lastnumvert, v1+lastnumvert, v2+lastnumvert, v2+lastnumvert))
                lastnumvert += len(vertices)

                mtl.write("newmtl mtl%d\n" % (i))
                mtl.write("map_Ka LAT%d_LON%d_Z%d_%d.jpg\n"  % (self.lat, self.lon, self.zoom, i))
                mtl.write("map_Kd LAT%d_LON%d_Z%d_%d.jpg\n"  % (self.lat, self.lon, self.zoom, i))

                jpg = open('../../../data/objs/LAT%d_LON%d_Z%d_%d.jpg' % (self.lat, self.lon, self.zoom, i), 'w')
                jpg.write(urlopen(image_url).read())
                jpg.close()

            mtl.close()
            obj.close();

            print "SAVED"
        else:
            print "ALREADY EXISTS"

Full code available here: https://github.com/marsman12019/nokiaGrabber

jackkoo

10 Feb 2015

Looks like it’s floating, but its actually attached with the spheres.

columns2

The shape of the gap is dictated by a point. There’s a grid of rectangles, and they get extruded by the distance between itself on the original grid and the point. Below, the point is in the middle, therefore middle rectangles are lower since they are closer to the point. (The left one). The right one has the point down low where it touches the ground.

thePointInMiddleimage2

You can see where the columns connect in the empty looking areas.

connectingArea


Here’s my early sketch. I like how my sculpture turned out but one problem with it is that the sphere doesn’t always touch both planes. I have to manually adjust the sphere to connect them. I tried making the sphere bigger/smaller, but the results didn’t look very good. In the end my high render pieces had procedural elements, but the parameters did not affect the procedural part enough. The main procedural parameter is only the shape of how the columns break, and they aren’t interesting enough.

IMG_0077

An obj of the object, (verified in rhino that it was printable with the “check object” function).

Here is a picture of my code on imgur.

Grasshopper file