Final Project: Ant Farm Unwrapped
Architecture for Everyone
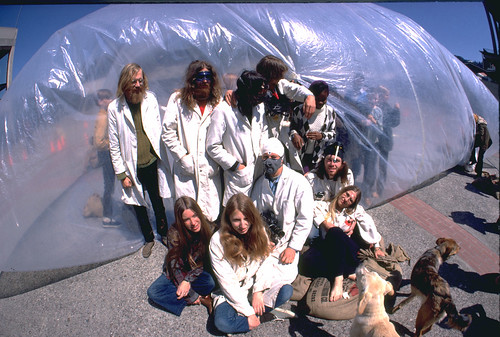
What if creating architecture was something that anyone could do in their back yard? This is the question Ant Farm, the legendary early-70s artist collective asked when they wrote the Inflatocookbook, an a recipe book for inflatable structures that attempted to liberate architecture from the realm of professionals.
With the advent of computer graphics and accessible CAD software Ant Farm’s dream of democratic architecture seems more plausible than ever. With this in mind I wrote a pattern generator for inflatable structures, implemented as a plugin to Google Sketchup. A digital supplement to the Inflatobookbook, it simplifies one of the most difficult parts of making an inflatable: deciding where to cut.
The Software
The hardest thing about building an Ant-Farm-style inflatable is designing the flat cut-out pattern used to create the 3D form. My plugin lets the computer do the thinking for you. All you need to give it is a model.
Existing Software
| Cheap | Cross-Platform | Easy To Use | |
|---|---|---|---|
| Lamina | $360 | Windows | Yes |
| Pepakura Designer | $38 | Windows | Yes |
| Blender Plugins | $0 | Windows, Mac, Linux | No |
| Ant Farm Unwrapped | $0 | Windows, Mac | Yes |
Before I created my plugin I hoped to modify existing software to create plans inflatables. However I was dissatisfied with the cost and difficulty of existing unfolding software.
Google Sketchup was an ideal platform for my plugin. It’s free, cross-platform, easy to use, and scriptable in Ruby.
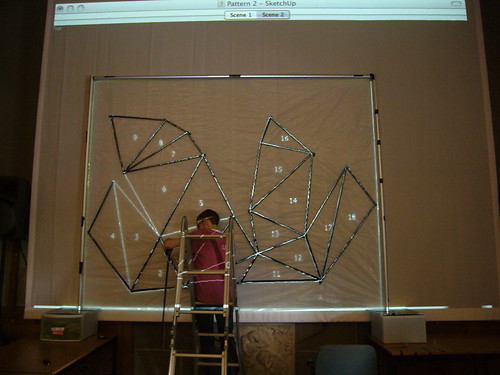
The Algorithm
The plugin’s unfolding algorithm is based on a post by StackOverflow user Theran. It works by representing the 3D shape as a graph. Below is an example of how the algorithm works on a cube:
- Polygonization


The sketchup model is converted into triangles—a polygon mesh.
- Graph Generation

The polygon mesh is converted into a graph (in the computer science sense.) Each face is a vertex in the graph, and each edge joining two faces in the polygon mesh is a connection between the two vertices in the graph.
- Optimization

By applying Dijkstra’s algorithm to this graph, we get a tree where every connection represents an edge that we won’t cut, but will ‘fold’ when the structure is inflated.
The edges to fold are chosen based on how much they would need to bend to achieve the right shape. Edges that connect faces with large angles between their normals are less likely to be used as folds than faces with similar curvature. In the cube below, it’s much more likely that 5 will share an edge with 4 than with 8 because the difference in curvature is small between them.
- Flattening


Once the edges to fold are determined, each face is laid out flat one at a time. The first face placed is the one determined to produce the lowest overall cost by the Floyd-Warshall algorithm. From there, all of the other faces are placed, connected to the other shapes by their fold edges.
Occasionally two faces will overlap in the unfolding. When this occurs, the program creates a separate shape that doesn’t intersect and continues adding faces off of that new shape.
Simplification and Segmentation
This algorithm can be very slow for more complicated meshes, so it’s a good idea to simplify any model you provide it. I use a piece of software called MeshLab to clean up and simplify the mesh before loading it into Sketchup. The quadratic mesh simplification algorithm available in MeshLab can lower the number of polygons in a model while still maintaining its basic form.
With large models, segmenting the mesh into components before processing can help make the output simpler. In the bunny model I created, I made a separate model for each ear, the head, the tail, the feet, and the body.
In a future version of the plugin, I plan to automate these steps.
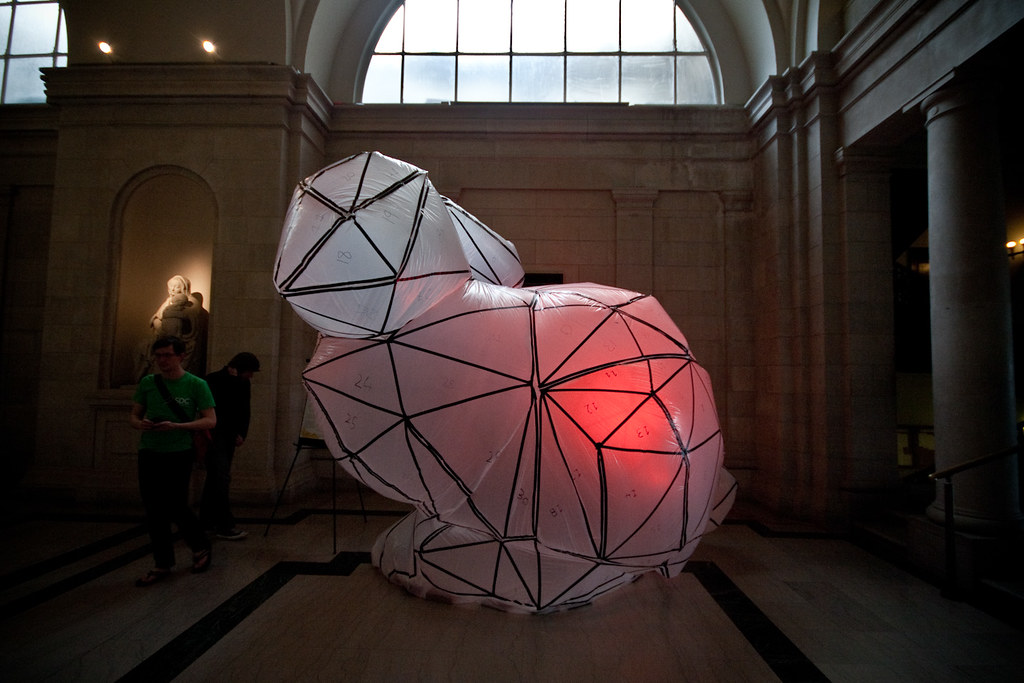
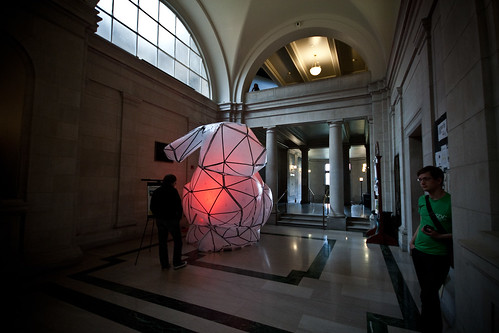
The Bunny

To test my software I decided to build a 12’ tall Stanford Bunny—a classic generic 3D model and somewhat of an in-joke among graphics experts. When a new graphics algorithm is created it’s usually tested first on the Stanford Bunny.
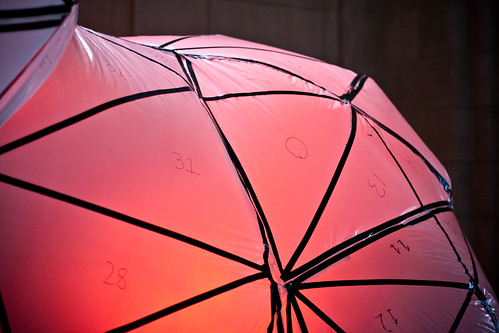
After some pre-processing, I ran my plugin on a model of the bunny. It produced several pieces, available as a printable PDF below. The numbers on the faces represent the order in which the software laid down each face.

Construction
Materials
| Item | Price | |
|---|---|---|
| Husky 4 Mil, 10 Ft. x 100 Ft. Clear Polyethylene Sheeting Roll
I used this cheap polyethylene, intended for construction, as a membrane for my inflatable. It’s available in most hardware stores, usually in the paint section. |
$43.60 | |
 |
16″ Hand Impulse Bags Sealer (SPB16)
This machine fuses together pieces of plastic to create a thin, tight seal. It greatly simplified the sealing process. In all, I sealed 218 feet of plastic over 125 seams. |
$150.49 |
 |
Utilitech 20″ High Velocity Floor Fan
During the final show I inflated the bunny with a borrowed fan. Afterwards I bought this 5000 CFM (cubic feet per minute) output fan from Lowe’s. It inflates the bunny but has trouble maintaining its speed when any pressure is applied to the bunny. I’m thinking of returning it and finding a more powerful fan. |
$69.98 |
Pattern
I used a computer projector to get the pattern I had created in Sketchup onto plastic. I put a piece of black electrical tape over each line in the projection and wrote each face’s number using a black sharpie. This step took the most time.
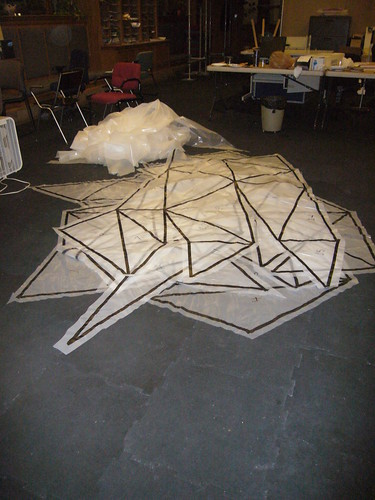
Afterwards I cut out each shape in preparation for sealing, leaving about an inch and a half around the edge for creating a seam.
Sealing
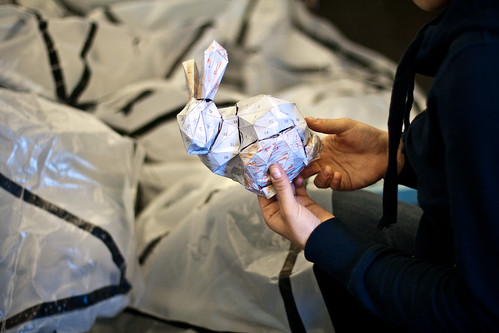
A scale paper model of the bunny helped align the pieces in preparation for sealing.
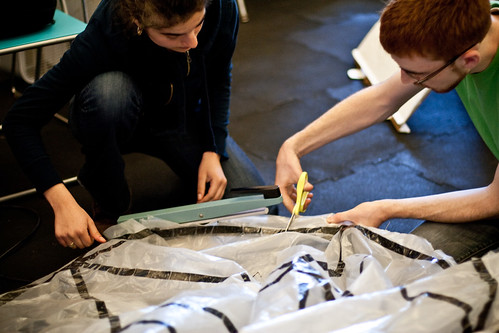
Sealing the bunny is a lot like sewing—It’s done inside out. First I matched up the adjoining faces with the outside, taped sides of the plastic facing in. Then I used the impulse sealer to fuse the plastic at the place where the two pieces overlapped. Since the impulse sealer I used wasn’t big enough, I cut a flap in the excess plastic each time so that it would fit in the machine.
Alternatively, a clothing iron can be used for this step. I prefer the impulse sealer because of the clean seam it creates.
Inflation
I don’t have a picture of how I attached the bunny to the fan. There wasn’t much time before the show to design a proper fan tube, so it’s pretty MacGyver. I just cut a slit in the side of the bunny and attached the plastic to the fan using packing tape. Surprisingly the seal held.

After inflation, I found some holes that the impulse sealer had missed. A friend helped me seal them with packing tape from inside the bunny.
The Show
During the show my bunny sat in the hallway of Carnegie Mellon’s College of Fine Arts building. It was backlit with a stage light with a red gel.
Thanks
This project is funded by a student grant from the Fine Foundation, received through the Electronic Arts area of the Carnegie Mellon School of Art
Thank you to everyone who helped assemble the bunny. You know who you are!
comments from piratepad 4/21
Max
———————————————————————
Aren’t some shapes (like an hourglass shape) impossible to unfold without overlap? Were you trying to say it was a bug in the code, or something else?
-Yep, that’s something I should look at. There are algorithms to make any surface into a developable surface. The other option is to make several shapes.
How are you going to attach the plastic pieces together? Glue?
Very nice progress! I can’t wait to see the actual objects. Again, though, I kind of wish it did something else instead of just making shapes, maybe using some sort of user-generated or scraped information when creating the shapes. -Amanda
Anyway you could have a mini workshop of you putting together a small inflatable so people feel like they could put your tool to use?