Category Archives: project-1

Erica

30 Jan 2013

self-organizing-map

Self Organizing Map

optical-flow

Optical Flow

I chose to try to include optical flow and a self-organizing map in the same of application. I picked these two in particular because I thought it could be really engaging to interact with such a map using the optical flow grid implemented by Denis Perevalov that I posted about here. This would allow the user to highlight different aspects of the map to get a better idea of how the values are interacting and influencing each other. I think that combining these two addons in this way could be an interesting approach for our data visualization project, but for the purposes of the Upkit Intensive I only got as far as compiling the two addons in the same project. I did test out each of the addons’ examples and will post videos of both below for anyone who is interested in a visual explanation of what each one does. Although it is unnecessary for me to post the example code as it is already on github for both addons, I have posted the code for self-organizing map here and for optical flow here.

Self Organizing Map from Erica Lazrus on Vimeo.

Optical Flow from Erica Lazrus on Vimeo.

Erica

30 Jan 2013

textRainTo implement Text Rain in Processing, I created a few helper classes. First, I create a Character class that draws a character at its current x and y location and detects whether or not the character is free falling or if it landed on a dark spot. It does so by checking the brightness of the pixel directly below it and setting a boolean within the class. I also created a camera class so that I could test the application out with different types of cameras, namely black -and-white and grayscale. I had some issues with thresholding background brightness so I tried mapping each pixel’s brightness to an exponential function to create a bigger differentiation between light and dark values but I still find that I need to adjust the threshold based on the location in which I am running the project.

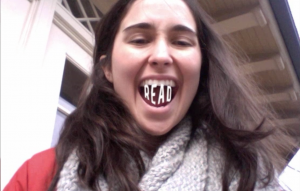
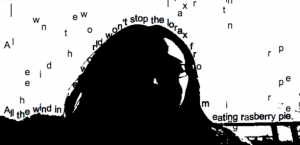
Text Rain from Erica Lazrus on Vimeo.

Below is my code which can also be downloaded here:

Main text rain class:

import processing.video.*;

Capture camera;
CameraBlackWhite bwCamera; 
CameraGrayscale gsCamera;

color bgColor;

String text;
Character[] characterSet1;
Character[] characterSet2;
Character[] characterSet3;

public void setup() {
  size(640, 480, P2D);
  smooth();

  int threshold = 50;

  gsCamera = new CameraGrayscale(this, threshold);
  gsCamera.startVideo();

  bgColor = color(#ffffff);

  text = "We are synonyms for limbs' loosening of syntax, and yet turn to nothing: It's just talk.";
  characterSet1 = new Character[text.length()];
  characterSet2 = new Character[text.length()];
  characterSet3 = new Character[text.length()];
  for (int i=0; i < text.length(); i++) {
    char c = text.charAt(i);
    color col = color(random(255), random(255), random(255));
    float speed = random(1, 6);
    characterSet1[i] = new Character(c, col, 14, 5 + i*7.25, speed, threshold);
    characterSet2[i] = new Character(c, col, 14, 5 + i*7.25, speed, threshold);
    characterSet3[i] = new Character(c, col, 14, 5 + i*7.25, speed, threshold);

    characterSet1[i].start();
  }
}

public void draw() {
  background(bgColor);
  update();
  render();
}

public void update() {
  gsCamera.update();

  for (int i=0; i < text.length(); i++) {
    characterSet1[i].update();

    if (characterSet1[i].getCurYPos() > height/2) {
      characterSet2[i].start();
    }
    else if (characterSet2[i].getCurYPos() - textAscent() >= height || characterSet2[i].getCurYPos() < 0) {
      characterSet2[i].setCurYPos(0-(textAscent() + textDescent()));
      characterSet2[i].stop();
    }

    characterSet2[i].update();
  }
}

public void render() {
  for (int i=0; i < text.length(); i++) {
    characterSet1[i].render();
    characterSet2[i].render();
    characterSet3[i].render();
  }
}

Abstract camera class:

public abstract class Camera {
  private Capture video;
  private int numPixels;
  
  private int threshold;
  
  public void startVideo() {
    getVideo().start();
  }
  
  public abstract void update();
  
  public abstract void render();
  
  public Capture getVideo() {
    return this.video;
  }
  
  public void setVideo(Capture video) {
    this.video = video;
  }
  
  public int getNumPixels() {
    return this.numPixels;
  }
  
  public void setNumPixels(int numPixels) {
    this.numPixels = numPixels;
  }
  
  public int getThreshold() {
    return this.threshold;
  }
  
  public void setThreshold(int threshold) {
    this.threshold = threshold;
  }
}

Black and white camera class:

public class CameraBlackWhite extends Camera {
  private color BLACK = color(#000000);
  private color WHITE = color(#ffffff);

  public CameraBlackWhite(Text_Rain_2_0 applet, int threshold) {
    setVideo(new Capture(applet, width, height));
    setNumPixels(getVideo().width * getVideo().height);

    setThreshold(threshold);
  }

  public void update() {
    if (getVideo().available()) {
      getVideo().read();
      getVideo().loadPixels();

      loadPixels();

      float pixelBrightness;
      for (int i=0; i < getNumPixels(); i++) {
        int pixelX = i % width;
        int pixelY = i / width;

        pixelBrightness = brightness(getVideo().pixels[i]);
        pixelBrightness = pow(pixelBrightness, 3);
        pixelBrightness = map(pixelBrightness, 0, 16581375, 0, 255);

        if (pixelBrightness > getThreshold()) {
          pixels[(width-1-pixelX) + pixelY*getVideo().width] = WHITE;
        }
        else {
          pixels[(width-1-pixelX) + pixelY*getVideo().width] = BLACK;
        }
      }

      updatePixels();
    }
  }

  public void render() {
  }
}

Grayscale camera class:

public class CameraGrayscale extends Camera {
  private color BLACK = color(#000000);
  private color WHITE = color(#ffffff);

  public CameraGrayscale(Text_Rain_2_0 applet, int threshold) {
    setVideo(new Capture(applet, width, height));
    setNumPixels(getVideo().width * getVideo().height);

    setThreshold(threshold);
  }

  public void update() {
    if (getVideo().available()) {
      getVideo().read();
      getVideo().loadPixels();

      loadPixels();

      float pixelBrightness;
      for (int i=0; i < getNumPixels(); i++) {
        int pixelX = i % width;
        int pixelY = i / width;

        pixelBrightness = brightness(getVideo().pixels[i]);
        pixelBrightness = pow(pixelBrightness, 3);
        pixelBrightness = map(pixelBrightness, 0, 16581375, 0, 255);

        if (pixelBrightness > getThreshold()) {
          pixels[(width-1-pixelX) + pixelY*getVideo().width] = WHITE;
        }
        else {
          pixels[(width-1-pixelX) + pixelY*getVideo().width] = color(pixelBrightness);
        }
      }

      updatePixels();
    }
  }

  public void render() {
  }
}

Character class:

public class Character {
  private char c;
  private color col;
  private int sz;

  private float xPos;
  private float curYPos;
  private float ySpeed;

  private int threshold;
  private boolean falling;

  public Character(char c, color col, int sz, int threshold) {
    setC(c);
    setCol(col);
    setSz(sz);

    setXPos(0);
    setCurYPos(0-(textAscent() + textDescent()));
    setYSpeed(0);

    setThreshold(threshold);
    setFalling(false);
  }
  
  public void start() {
    setFalling(true);
  }
  
  public void stop() {
    setFalling(false);
  }

  public Character(char c, color col, int sz, float xPos, float ySpeed, int threshold) {
    setC(c);
    setCol(col);
    setSz(sz);

    setXPos(xPos);
    setCurYPos(textAscent() + textDescent());
    setYSpeed(ySpeed);

    setThreshold(threshold);
    setFalling(true);
  }

  public void update() {
    if (getCurYPos() < 0 || ceil(getCurYPos() + 1) >= height || isLocationBright((int)getXPos(), (int)getCurYPos() + 1)) {
      setFalling(true);
    }
    else {
      setFalling(false);
    }
    
    if (isFalling()) {
      textSize(getSz());

      float newYPos = getCurYPos() + getYSpeed();
      setCurYPos(newYPos);

      if ((newYPos - textAscent())> height) {
        setCurYPos(0-(textAscent() + textDescent()));
      }
    }
    else {
      setCurYPos(findFirstBrightSpot((int)getXPos(), (int)getCurYPos()));
    }
  }

  public void render() {
    fill(getCol());
    textSize(getSz());
    textAlign(CENTER, BOTTOM);
    text(getC(), getXPos(), getCurYPos());
  }
  
  public boolean isLocationBright(int x, int y) {
    int testValue = get(x, y);
    float testBrightness = brightness(testValue);
    return (testBrightness > getThreshold());
  }
  
  public int findFirstBrightSpot(int x, int y) {
    int yPos;
    for (yPos = y; yPos > 0; yPos--) {
      if (isLocationBright(x, yPos)) break;
    }
    return yPos;
  }

  public char getC() {
    return this.c;
  }

  public void setC(char c) {
    this.c = c;
  }

  public color getCol() {
    return this.col;
  }

  public void setCol(color col) {
    this.col = col;
  }

  public int getSz() {
    return this.sz;
  }

  public void setSz(int sz) {
    this.sz = sz;
  }

  public float getXPos() {
    return xPos;
  }

  public void setXPos(float xPos) {
    this.xPos = xPos;
  }

  public float getCurYPos() {
    return this.curYPos;
  }

  public void setCurYPos(float curYPos) {
    this.curYPos = curYPos;
  }

  public float getYSpeed() {
    return this.ySpeed;
  }

  public void setYSpeed(float ySpeed) {
    this.ySpeed = ySpeed;
  }

  public int getThreshold() {
    return this.threshold;
  }
  
  public void setThreshold(int threshold) {
    this.threshold = threshold;
  }

  public boolean isFalling() {
    return this.falling;
  }

  public void setFalling(boolean falling) {
    this.falling = falling;
  }
}

Erica

30 Jan 2013

For this project, I collaborated with Caroline Record and Andrew Bueno to make a sifteo alarm clock. For full details and a video demonstration, click here.

Caroline

29 Jan 2013

Screen shot 2013-01-29 at 4.33.13 PM


In this grand collaboration between Andrew Bueno, Erica Lazrus and Caroline Record we created a prototype for a sifteo alarm clock. In case you have never stumbled upon these new fangled little cubes before, Sifteos are the new kid on the block for tangible computing. Sifteos are not a single device, but rather a collection of cubes that are aware of their orientation to one another. Our idea was to create an alarm clock that would only stop ringing when all the cubes were gathered together in a certain orientation. The user could set the level of difficulty by hiding the cubes about their abode for their future sleepy self to collect in the wee hours of the morning. We used two cubes: one as the hours and one as the minutes. Each could be set by tilting the cubes upward or downward. We have lots of ideas of how we could improve on our initial prototype. For example we would like to use png fonts , include more cube, and represent time more accurately.

code on github: https://github.com/crecord/SifteoAlarmClock 

Erica: Erica was MVP, and bless her soul for it. She certainly
did the most coding and managed to figure out the essentials of how
exactly we could get this alarm to work, and she tirelessly built off Bueno’s timing mechanism to figure out how to represent  time without the Sifteo using too much memory every time it checked how many minutes and seconds were left on the clock.

Caroline: Caroline was our motion-mistress, and implemented our
system for setting the alarm based on the movement of the Sifteo. She also
came up with the original idea, and so deserves a ton of credit in that
respect. Caroline also impeded the process by bothering Erica and Bueno to explain the workings of c++.

Bueno: During our short brainstorming process, Bueno
suggested that, if the alarm were to have different difficulty settings,
that we consider solving anagrams as a possible challenge for the user.
When we actually got down into the coding, it was often Bueno’s job to sift
through the documentation/developer forums in order to figure out answers
to some of our confusion concerning how exactly we should go about coding
the darn things. In the end, Bueno figured out how exactly we could go about
ensuring the Sifteo could keep track of time.

Sifteo Alarm Clock from Caroline Record on Vimeo.

Caroline

29 Jan 2013

Screen shot 2013-01-29 at 3.15.00 PM

I used Kyle Mcdonald’s syphonFaceOSC app to create a processing sketch that fills the viewers mouth with text that dynamically resizes to their mouth. Every time the mouth closes the word changes to the next one in the sequence. This piece resides in an interesting juncture between kinetic type, subtitles and lip reading. Now that I have built this tool I intend to brain storm ideas of how I could use is to make a finished piece or performance. I am interested in juxtaposing spoken with written word. I am also interested in finding out whether this has any applications to assist the deaf.

code on github: https://github.com/crecord/faceOSC

Caroline

29 Jan 2013

Screen shot 2013-01-29 at 4.34.17 PM


Text Rain is a famous interactive installation by Camille Utterback (1999). letters from a poem about motion and the body would rain down on viewers, resting on anything above a certain darkness threshold. If there is a flat surface for a long enough period words and sentence fragments become legible. Text Rain was revolutionary for it’s time because it was in the first waves of interactive art and was written before there were high level programming tools. I re-wrote text rain in Processing for this assignment.

Code on GitHub: https://github.com/crecord/textRain

Caroline

29 Jan 2013


Library Combo

Open framework add ons are written by generous people, who are helping make open framework a better place. However, no one is payed to write these addons and they can be in any state of development. The prompt for this assignment was to get two different libraries compiling in the same of sketch. After a long process of trial and error I ended up combining ofxOpticalFlowFarmback with ofxpostprocessing. Optical flow analyses movement based on direction and post processing turns whatever is being rendered into a gl mesh and applies filters to them. I selected these two libraries because I am interested in using camera vision to analyse motion and create interaction through that motion and because I am interested in learning more about how to use open gl to create fast custom filters.

Link to code on git: https://github.com/crecord/OfxAddonCombo

ofxAddons from Caroline Record on Vimeo.

Joshua

29 Jan 2013

textRain_screenShot_JLB

To implement text rain I created a class called Letter which contains a position, velocity, char, and some functions to move the letter and check if it is sitting on dark pixels.  To move the letters up I check another pixel above the first, and if it is also dark enough, the letter moves up to that position.  After changing the video to grey scale I simply check the red values (r,g, and b are now all the same) and if they are below a threshold, which i determined experimentally, they cause the letter to stop moving downward, or even move upward.

https://github.com/jlopezbi/textRainImplementation


import processing.video.*;
Capture video;
int[] backgroundPixels;
int numPixels;
int numLetters = 300;
float threshold = 31;
ArrayList rain;

void setup() {
  size(600, 450, P2D);
  smooth();
  video = new Capture(this, 160, 120);
  video.start();
  numPixels = video.width * video.height;
  backgroundPixels = new int[numPixels];
  loadPixels();

  rain = new ArrayList();
  for (int i = 0; i< numLetters;i++) {
    genRandLtr();
  }
}

void draw() {
  if (video.available()) {
    video.read();
    video.filter(GRAY);
    image(video, 0, 0, width, height);

  }
  loadPixels();
  for (int i =0;i<rain.size()-1;i++) {
    Letter l = (Letter) rain.get(i);
    l.updatePos();
    l.display();
    if (l.finished()) {
      rain.remove(i);
      genRandLtr();
    }
  }
  color pix = pixels[mouseY*width+mouseX];
  println(red(pix) +" "+ green(pix)+" "+ blue(pix));
  updatePixels();
}

void genRandLtr() {
  PVector pos = new PVector(random(0, width), 30);
  PVector vel = new PVector(0, random(0.5, 1));

  int lowerUpper = (int)random(2);
  int ascii;
  if (lowerUpper == 0) {
    ascii = (int) random(65, 90.1);
  }
  else {
    ascii = (int) random(97, 122.1);
  }

  char ltr = char(ascii);
  Letter letter = new Letter(pos, vel, ltr);
  rain.add(letter);
}

class Letter {
  //GLOBAL VARIABLES
  PVector pos;
  PVector vel;
  char ltr;
  int aboveCheck = 4;
  //CONTRUCTOR
  Letter(PVector _pos, PVector _vel, char _ltr){
    pos = _pos;
    vel = _vel;
    ltr = _ltr;

  }

  //FUNCTIONS
  void display(){
    textAlign(CENTER,BOTTOM);
    text(ltr, pos.x,pos.y);
    noFill();
    //ellipse(pos.x,pos.y,5,5);
  }

  void setRandPos(){
    pos = new PVector(random(0,width), 0);
  }

  void updatePos(){
    float xPos = pos.x;
    float yPos = pos.y;
    int indexAhead = int(xPos)+int(yPos)*width;
    int indexAbove = int(xPos)+int(yPos-aboveCheck)*width;
    float aheadCol = red(pixels[indexAhead]);
    float aboveCol = red(pixels[indexAbove]);
    if(aheadCol>threshold){
      pos.set(xPos+vel.x, yPos+vel.y,0);
    } 
    else if(aboveCol<=threshold){      
       pos.set(xPos, yPos-aboveCheck,0);     
     }        
}      

boolean finished(){     
   return(pos.y>=height-1 || pos.y<=aboveCheck);
  }  
}

Joshua

29 Jan 2013

faceOsc head orientation -> processing -> java Robot class -> types command rapidly while using rhino

I like rhino 3d.  It is a very powerful nurbs modeler.  There are certain commands, specifically join/explode, group/ungroup and trim/split, which are used all the time.  To execute these commands one has to either click a button or type the command and press enter.  Both take too long/I’m lazy.

So I made this thingy that detects various head motions and triggers rhino commands.  Processing takes in data about the orientation of the head about x,y,and z axis.  Each signal has a running average, a relative threshold above and below that average, and a time zone (min and max time) in which the signal pattern can be considered a trigger.  The signal pattern required is simple: the signal must cross the threshold and then return. The time that it takes to do this must fit within the time zone.  In the video there are three graphs on the right side of the screen.  They are in order, from the top, as x y and z.  The light blue horizontal lines represent the relative threshold (+and-).  The thin orangy line is the running average.  The signal is dark blue when in bounds, light blue when below, and purple when above.  The gray rectangle approximate the time zone, with the vertical black line as zero (it really should be at the right edge of each graph, but it seemed to cluttered).

Screen Shot 2013-01-29 at 1.14.29 AM

Sometimes its rather glitchy. Especially in the video: the screen grab makes things run slow. Also, the x and y axis triggers are often confused.  I have to hold my head pretty still.  More effective signal processing would help.  It would be awesome to be able to combine various triggers to have more commands, but this would be rather difficult.  I did set up the structure so that various combinations of triggers for different channels (like eyebrows, mouth and jaw) could code for specific commands.

 https://github.com/jlopezbi/faceOSC-Rhino