gloeilamp-Final

Skies worth Seeing

One of the subjects that appears again and again in my own photography is the sky. It is no doubt a classic subject for many photographers. The sky is of course always present and available to photograph, but is not necessarily always a compelling subject- so when does the sky become worth capturing? What are the qualities of the sky that transform it from a granted element of our everyday environment, into a moving and even sublime subject for a photograph?

To answer these questions and more, I looked to Flickr and my own image archive.

Choosing/culling images; identifying my own bias

Using the Openframeworks add-on ofxFlickr, by Brett Renfer, I was able to scrape thousands of images of skies.

My choice in tags, “sky, skyscape, clouds, cloudy sky, blue sky, clear sky, night sky, storm, stormy sky, starscape” absolutely had a large impact on the scraped images, as did the way that I was sorting the results (primarily by relevance and interestingness, as per Flickr’s API). Moreso, I was not able to find many images that were of the sky and only the sky- I had to reject many of the scraped images outright: clearly manipulated images, “astrophotography” type images of the sun or deep sky objects, monochrome images, illustrations, aerial images, or images with obtrusive foreground objects. Foreground objects were the most common reason for rejection; all together about 45% of the scraped images were rejected.

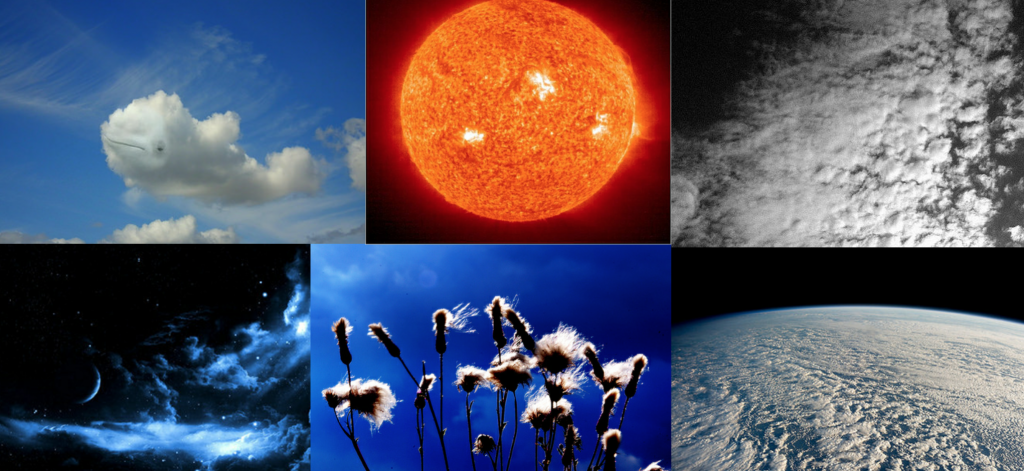
Many of the other images I scraped were acceptable in that the sky was clearly the primary subject, yet some landscape remained. This is an understandable compositional choice in photography but still was not appropriate for the analysis I wanted to make; with Golan’s help I developed a tool in Processing that would allow me to quickly crop images to just the sky.
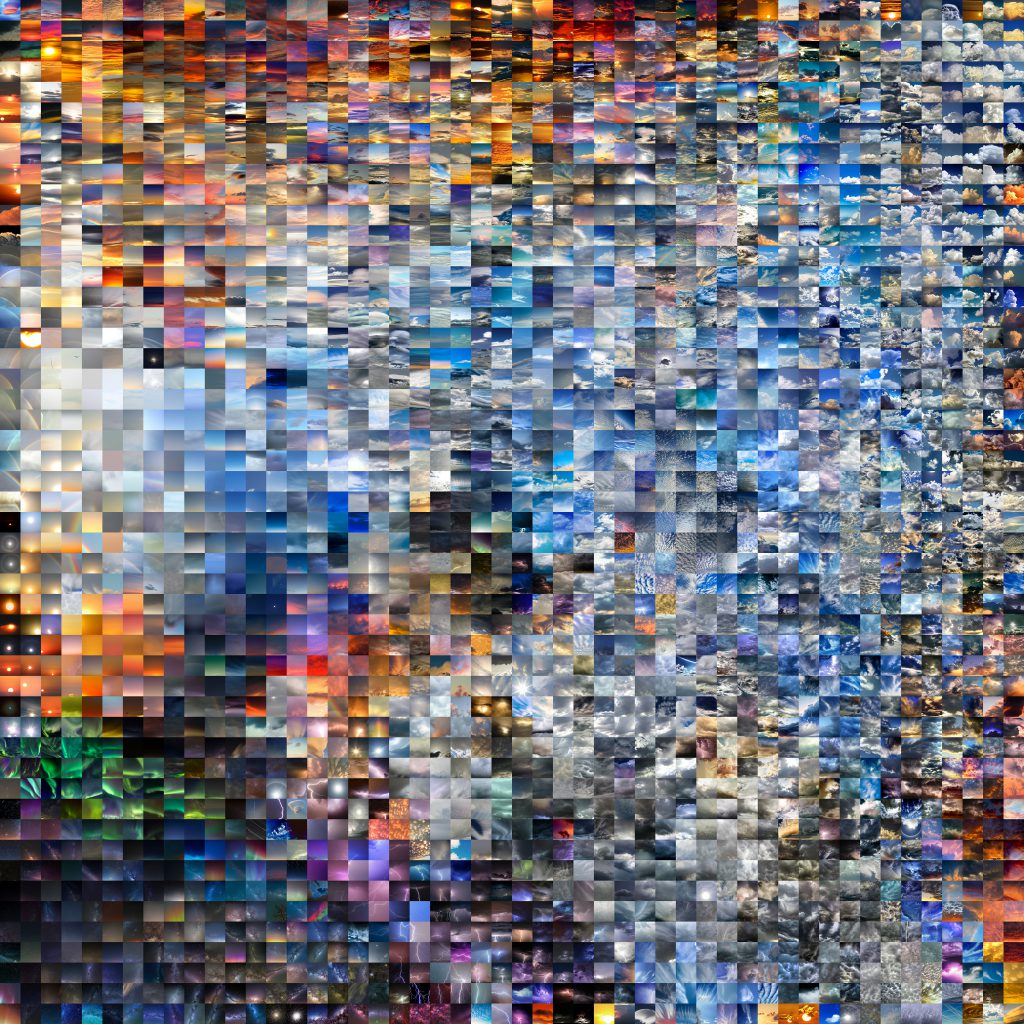
The Unsorted Images

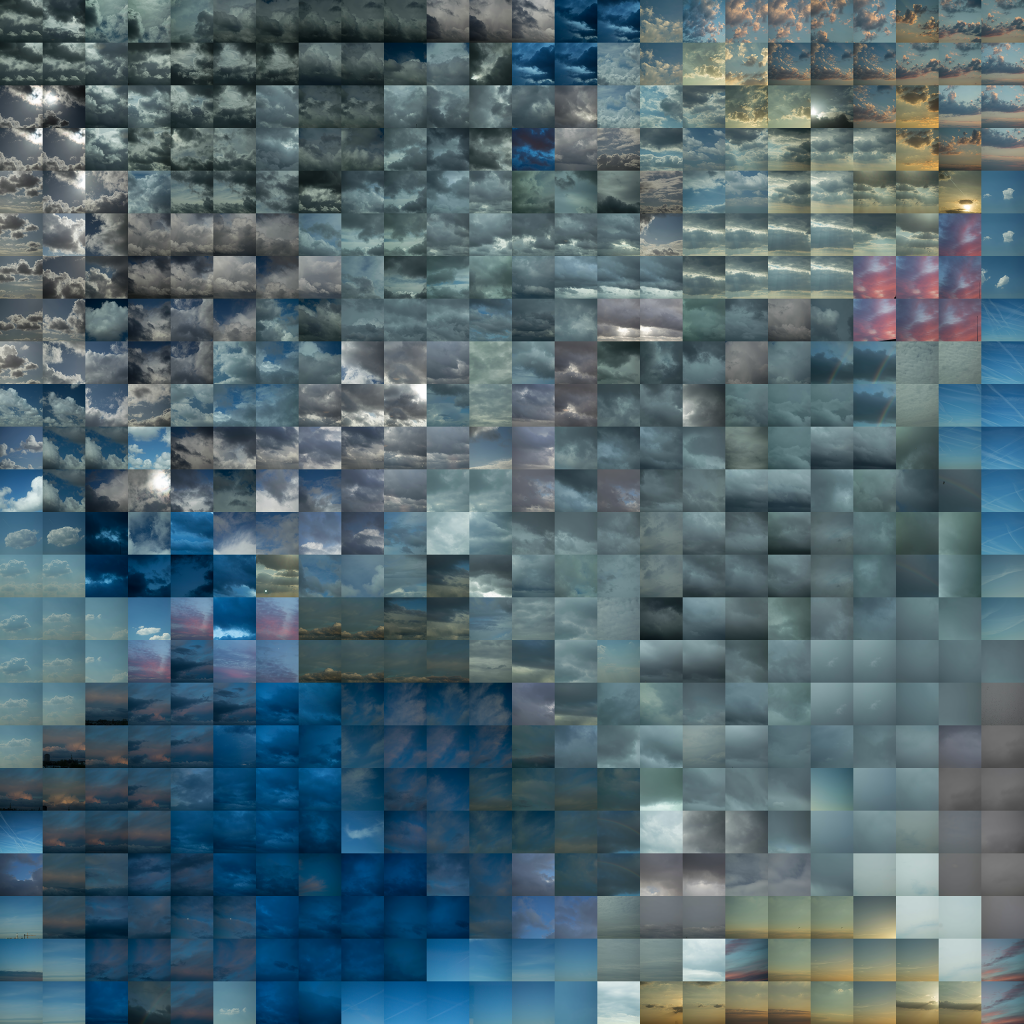
Arranged in a grid based on the order in which I downloaded them, they already reveal some information about the way the sky is photographed.

My primary observation at this stage is just how much variety there is in the images. The sky is traditionally thought of as blue, yet blue isn’t necessarily dominant in the collage. A huge amount of different sky conditions are represented, and the editing treatments span from the subtle to the incredibly exaggerated. Beyond this though, the unsorted collage is hard to interpret.
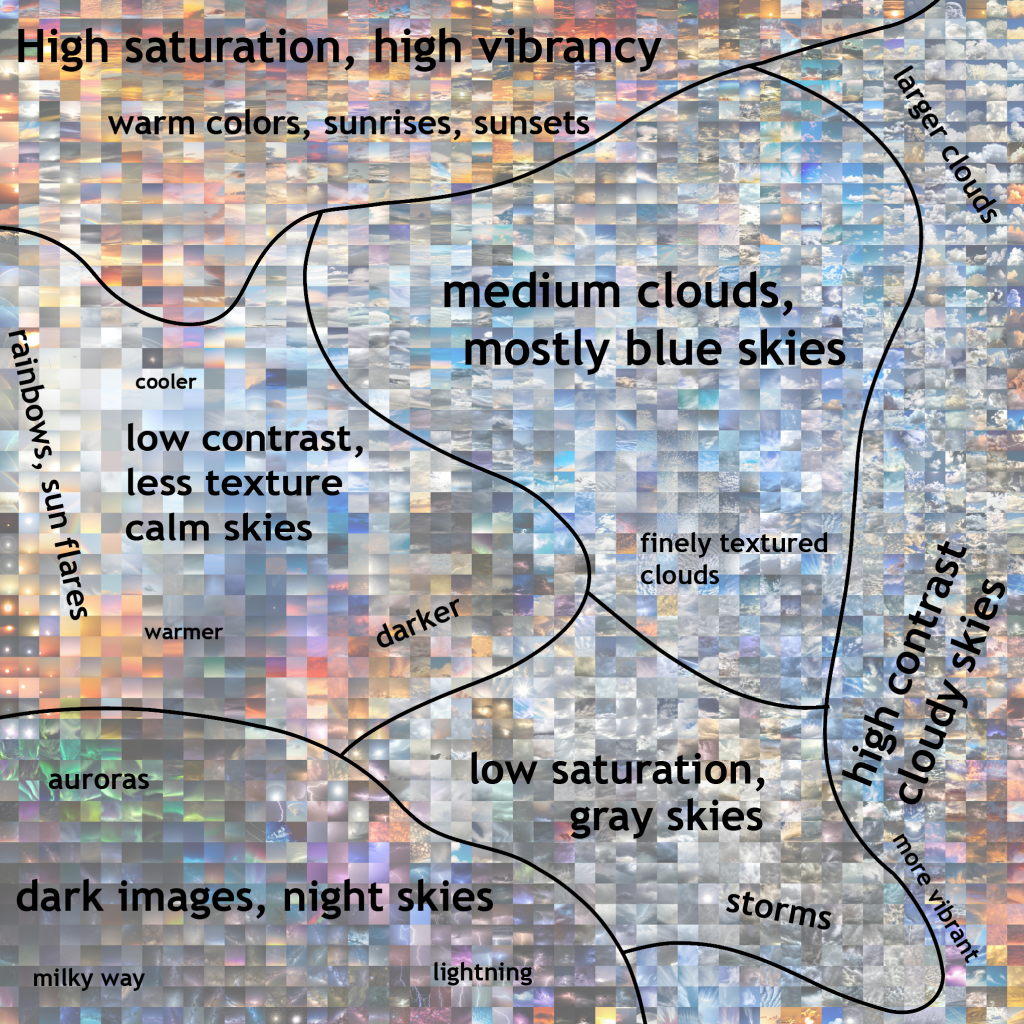
The Sorted Images

Seeking a greater sense of order in the images, I chose to sort using t-SNE, or t-distributed stochastic neighbor embedding. For this, I used the ofxTSNE add on by Gene Kogan. The sorted image itself is compelling, but can also better reveal the trends and variation within the dataset.

Now with some kind of organization, trends within the dataset start to emerge. Night skies are popular, but specialized (often requiring equipment like tripods, high ISO capable sensors); there are distinct categories here- auroras, the milky way, and lightning were the most dominant. Sunsets and sunrises dominate the top edge of the collage- this is a time when the sky is predictably interesting, so their high representation seems logical. The photographers here are clearly not shy about bumping up the colors in these images either.

Rainbows have a small but still notable presence; this is a compelling sky event, but is less predictable. Gray, stormy skies also make up a large portion of the image. The cloud formations here seem to be an attractive subject, but have less representation in the image set— perhaps because it isn’t always pleasant or feasible to go out and make images in a storm.

The largest sections, represented in the right side of the collage, show mostly blue skies with medium and large cloud formations. What varies between these two sections is how they are edited; I saw a distinct divide between images that were processed to be much more contrasty, and those that were less altered.

Even within the “calmer” images, where no large cloud features were present, there was a large variation in color. It’s safe to say that many of the more vibrant images here were also edited for increased saturation.

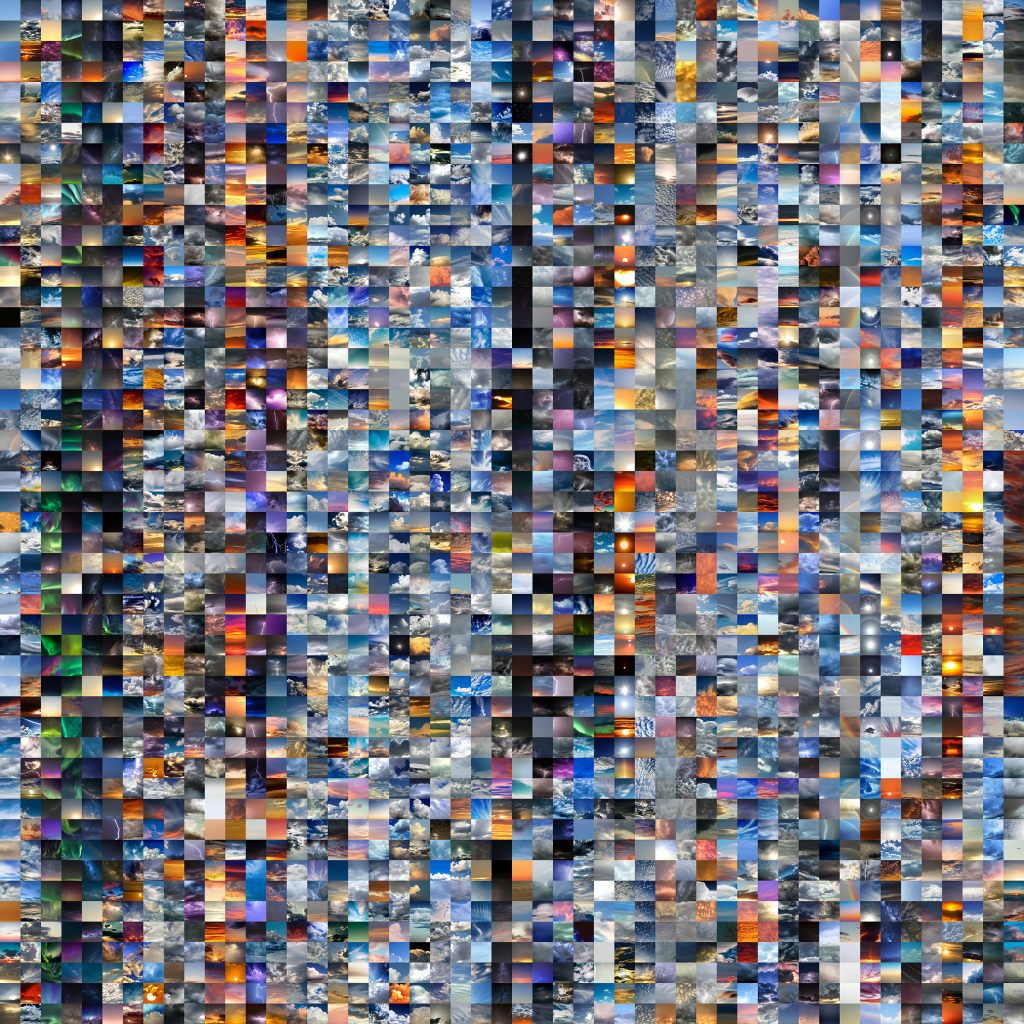
Applying this same process to my own images (albeit a more limited set; I took these ~200 images over the span of a few weeks from my window in Amsterdam) also allows me to compare my habits as a photographer to the Flickr community at large. I generally prefer not to edit my photos heavily, and leave the colors closer to how my camera originally captured them- Flickr users clearly have no problems with bumping up the vibrancy and saturation of their skies to supernatural levels.

Moving Forward

I would like to continue adding to this repository of images of skies and eventually run a larger grid, using a more powerful computer. I seemed to hit the limits of my machine at 2500 images. There are definitely diminishing returns to adding more images, but if I can further automate and streamline my scraping/culling process it could be worth it.

I am also considering what other image categories on Flickr that this method could provide insight into. I’d be particularly interested in exploring how people photograph water.

Additionally, I’m exploring how the collage itself might continue to exist as a media object- I  would like to produce an interactive online version that allows a user to zoom in and explore individual images in the collage, and view annotation and metadata related to each specific image as well as the sections.

As a physical object, I think the collage could make a nice silk scarf.


gloeilamp-finalProposal

*An inspiration: Tauba Aurbach’s RGB Colorspace Atlas

For the final project I would like to further investigate video as a volumetric form. I began this during the first project through my time remapped stereo videos, but would like to explore some other possibilities.

One workflow I am imagining would be:

  • Capture a scene with a specific subject, perhaps a person, in high-res video
  • Capture the same scene through photogrammetry or otherwise develop a watertight 3d model of the subject
  • Create a voxel representation of the video from the XYT domain
  • Intersect the 3D model of the subject with the voxels of the volumetric video

This would, I imagine, result in the subject’s movements over time being represented on their body as a texture. It could look pretty nuts.

Other possibilities for exploring these video volumes could be:

  • Produce the voxel volume of a video as a digital material that one can actually “sculpt” into, revealing different moments in time. Workflow would likely involve Processing + ImageJ + Unity, and output would likely be a VR or game-like experience.
  • A higher quality version of the stereo time-remapping I did with the bloggie camera. This would involve mounting and genlocking two DSLRs, potentially controlling through OpenFrameworks. This could also be an opportunity to revisit depth from stereo.
  • Underwater – I could do more underwater explorations with 2 waterproof gopros (knockoff)
  • A book- similar to Tauba Aurbach’s work I could produce these volumetric videos as flipbooks

gloeilamp-Event

Underwater RGBD Capture with Kinect V2 and DepthKit 

Can I capture a 3d image of me exhaling/blowing bubbles? 


For my event project, I explored a few possibilities for underwater 3d capture. After briefly considering sonar, structured light, and underwater photogrammetry a try, I settled on using Scatter’s DepthKit software. DepthKit is a piece of software built in OpenFrameworks which allows a depth sensor such as a Kinect (I used the Kinect V2, an infrared “time of flight” sensor) and a standard RGB digital camera (I used the Kinect’s internal camera) to be combined into a “RGBD” video- that is, a video that contains depth as well as color information.


In the past, James George and Alexander Porter produced “The Drowning of Echo” using an earlier version of DepthKit and the Kinect V1. They filmed from above the water, and though many of their shots are abstract, they were able to penetrate slightly below the surface, as well as capture some interesting characteristics of the water surface itself. In some of the shots it is as if the ripples of the water are transmitted onto the skin of the actress. Another project using DepthKit that I find satisfying is the Aaronetrope. I appreciate this project chiefly for its interactivity. It uses several RGBD videos displayed on the web interactively using a webGL library called three.js. http://www.aaronkoblin.com/Aaronetrope/

Along the way, I encountered a few complications with this project. Chiefly, these were due to the properties of water itself. I would obviously need a watertight box to house the Kinect. After much research into optics, I found that near-visible IR around 920NM, the frequency the Kinect uses, is greatly attenuated in water. This means that a lot of the signal the Kinect sends out would simply be absorbed and diffused, and not return back to the sensor in the manner expected.

Some of the papers that informed my decisions related to this project are:  Underwater reconstruction using depth sensorsAbsorption and attenuation of visible and near-infrared light in water: dependence on temperature and salinityUsing a Time of Flight method for underwater 3-dimensional depth measurements and point cloud imaging

With the challenges of underwater optics in mind, I proceeded to construct an IR transparent watertight housing from 1/4in cast acrylic. This material has exceptional transparency, and neither reflected nor attenuated the IR signal or color camera feed. I also attached 1/4-20 threaded bolt to the exterior of the box, to make it magic arm compatible.

I carried out initial testing right in my bathtub. Here, I tested three scenarios: Kinect over water capturing the surface of the water; Kinect over water trying to capture detail beneath the water; Kinect underwater capturing a scene under the water.

It was immediately pretty clear that I would be unable to penetrate the surface of the water if I wanted to capture depth information below the water; I definitely needed to submerge the Kinect. And to my surprise, when I first placed my housing under, it (sort of) worked! The IR was indeed absorbed to a large degree, and the area in which I was able to capture both video and depth data together proved to be very small. But even so, a RGBD capture emerged.

Into the Pool

The CMU pool is available for project testing by special appointment, so I took the plunge! The results I achieved were basically what I expected- the captures are more low-relief than full RGBD, and the depth data itself is quite noisy. I also discovered that the difference in refraction of light throws the calibration of the depth and RGB images way out of whack- manual recalibration was necessary, and even then it was difficult to sync. That said, I did have some great discoveries at this stage. Bubbles are visible! I was able to capture air exiting my mouth, as well as bubbles created by me splashing around.

Lastly, here is an example of where the capture totally went wrong, but the result is still a bit cinematic:

gloeilamp-eventProgress

Up and Running with DepthKit!

Currently I have DepthKit Capture and Visualize installed on the studio’s Veggie Dumpling PC. It worked with the Kinect V2 nearly immediately (a small filepath error needed to be corrected), so DepthKit in the studio is now a go.

Further, after exporting the video from DepthKit Visualize (Visualize exists for Mac OS/OSX but is really not usable, at least on 10.12.1, as the UI is invisible), I successfully dropped the clip into Unity.

Next steps: 

I am constructing a watertight box for the Kinect to begin underwater testing. In-studio testing has shown that high quality cast acrylic does not interfere with the sensing ability of the Kinect. I will tentatively use the CMU pool next week(meeting with aquatics director soon). Once I have a better idea about the sensing limitations in water, I will know what type of shots I am able to achieve. Further research into different types of underwater sensing lead me to be more optimistic; time of flight depth cameras have shown good results in papers like this.

Once the capture has been made, the question of the final media object remains. Now that I am able to get the clips into unity, I have the possibility of making this a VR experience. I have a feeling with the proper lighting and scene design it could be nice in the Oculus Rift. Else, I will make a video or series of gifs.


4/3/17

The box is constructed, but I still want to sure up the sealing. The area around the cord was not watertight despite my best efforts with silicone. May need to redesign that face of the box. (don’t panic, kinect is dry!)

Tests so far: splashes and ripples look pretty cool!

Submerged tests: mixed feelings on the results here so far; the actual depth being sensed seems pretty tiny. Definitely noisy. Looks more low-relief than anything else. That said, there is at least a visible output!

Working in the Browser!!! 

I’m trying to learn about a few different things here- chiefly, Javascript, WebGL, three.js, and shaders. Cobbling some things together, I have my model up in chrome! I am working to write my own shader that fits better with the watery captures, as well as making the models more satisfyingly interactive.

gloeilamp-eventProposal

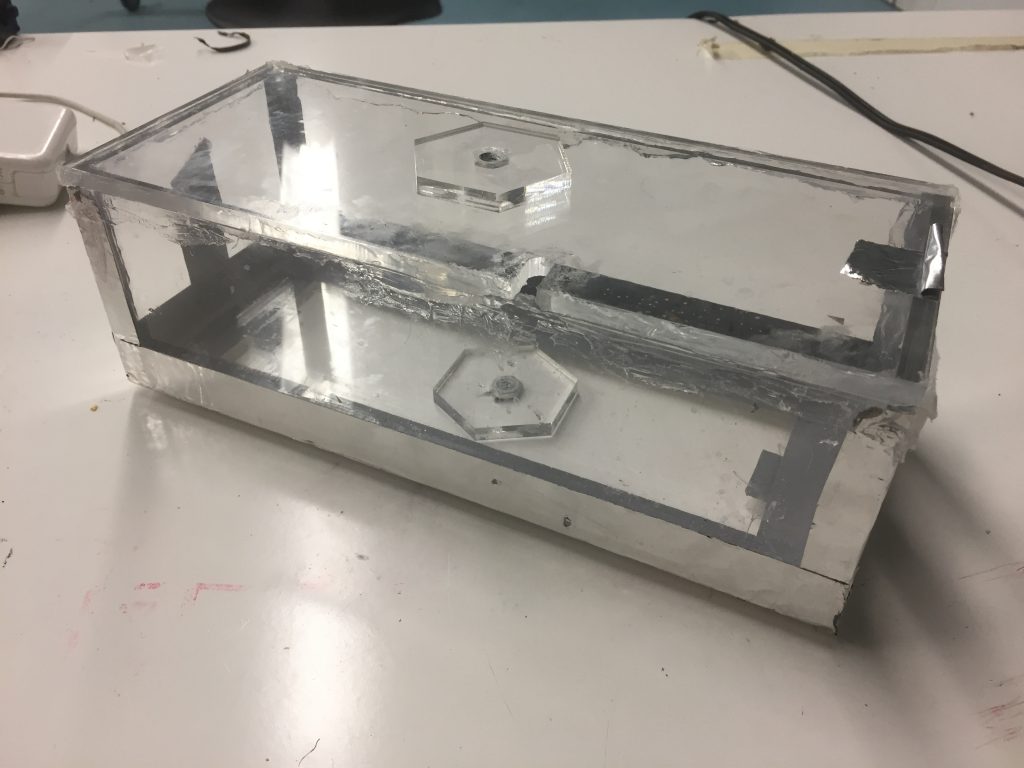
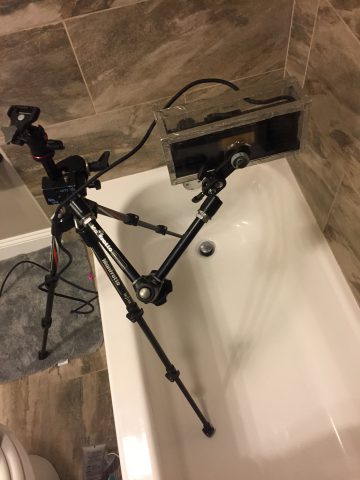
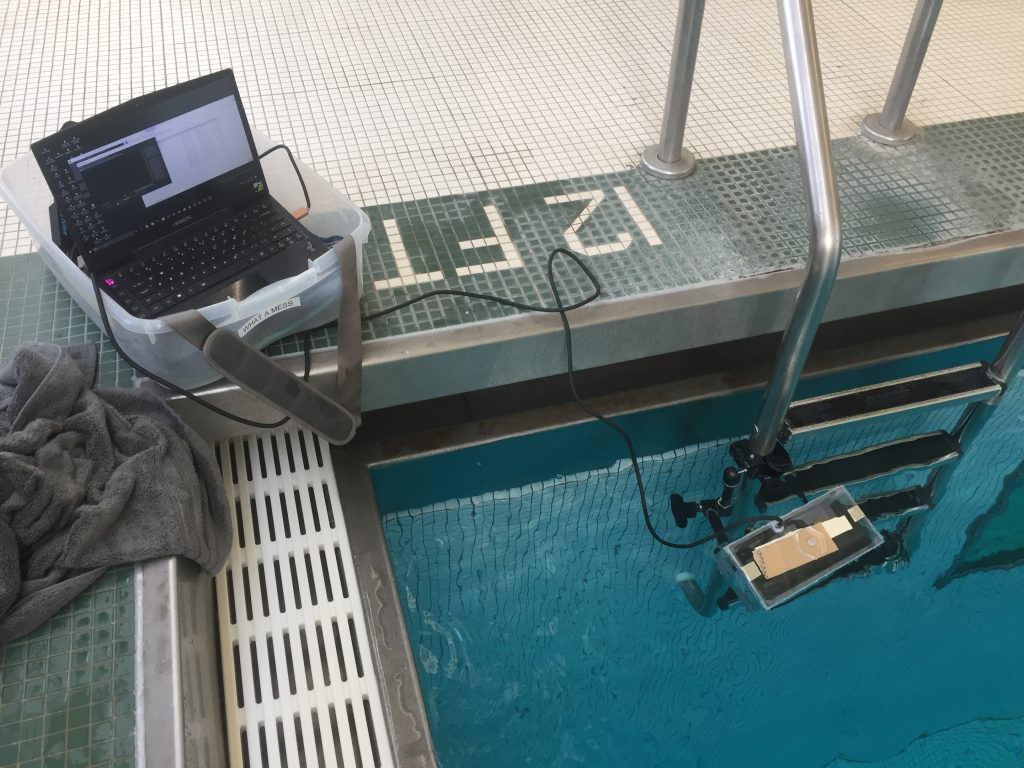
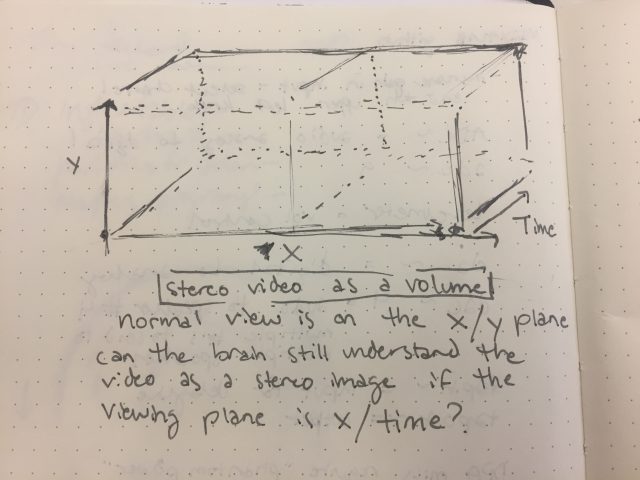
For my event project, I am largely interested in investigating things that happen underwater. I have two possible methods for capture-

  1. Depthkit underwater. I am constructing a polycarbonate underwater housing for the kinect v1 (1414), so that I may capture RGBD video underwater in the pool. I am especially curious to see how bubbles rising will appear in RGBD, so I will work on capturing a few different scenarios: person splashing into pool, creating many chaotic bubbles (medium distance shot); person holding their breath underwater, slowly releasing bubbles (close up shot); releasing bubbles from container (close up shot, no people only bubbles).
    1. The main uncertainty with this project is the great attenuation of near-IR wavelengths in water- the depth sensing abilities of the kinect will be quite compromised. I am hoping that the system will at least be usable within distances of ~1m.
  2. Sonar slitscan depth mapping. Using a sonar pod marketed to fisherman for “fishfinding,” I would like to create a sonar depthmap (bathymetric map) of local bodies of water. I have scouted out locations and will most likely use the Squaw Valley Park pond (known RC boating spot) for initial tests, and then take the system into non-manmade locations like North Park for richer mapping opportunities. The pod delivers a graph of the recorded sonar response over time, so I will systematically tow it using a RC boat in a grid pattern to obtain the bottom contours of the lake.
    1. My main concern with this project is the terrible online reviews of these pods. Depending on the model, they connect over bluetooth or a wifi hotspot, and many online reviewers state that the connection drops frequently or will not connect at all.


Gloeilamp-Place

Freestyle Drone Photogrammetry 

http://gph.is/2mKWBsn

Download a build of the game HERE.  Controls are WASD and IJKL.
Control forwards/backwards movement and roll with WASD, control up/down thrust and yaw with IJKL.

Freestyle drone flying and racing is a growing sport and hobby. Combining aspects of more traditional RC aircraft hobbies, videography, DIY electronics and even Star Wars Pod Racing (according to some), drone pilots use first person view controls to create creative and acrobatic explorations of architecture. My brother, Johnny FPV, is increasingly successful in this new sport.

For my capture experiment, I used Johnny’s drone footage as a window into Miami’s architecture. By extracting video frames from his footage, I was able to photogrammetrically produce models of the very architecture he was flying around. While position-locked footage from videography drones such as the DJI Phantom has been shown to create realistic 3d models, the frenetic nature of my footage produced a very different result.

http://gph.is/2mLD37d

As I produced models from the footage, I began to embrace their abstract quality. This lead me to my goal of presenting them in an explorable 3D environment. Using Unity, I built a space entirely out of the models from the drone footage. Even the outer “cave” walls are, in fact, a representation of a piece of Miami architecture. The environment allows a player to pilot a drone inside this “drone generated” world.

Technical Details & Challenges

My workflow for this project was roughly as follows. First, download footage and clip to ~10-30 second scenes where the drone is in an interesting architectural space. In Adobe Media Encoder, process the video to a whole number framerate, then export as images through FFMPEG. More about my process with FFMPEG is discussed in my Instructable here. Then, import the images to PhotoScanPro and begin a normal photogrammetry workflow, making sure to correct for fisheye lens distortion. After processing the point cloud into a mesh and generating a texture, the models were ready for input into Unity.

In the end, the 3D models I was able to extract from the footage have very little structural resemblance to the oceanfront buildings they represent. If not for the textures on the models, they wouldn’t be identifiable at all (even with textures, the connection is hard to see). I found that the drone footage more often than not produced shapes resembling splashes and waves, or were otherwise heavily distorted, and were much more a reflection of the way the drone was piloted than a representation of the architecture.

In Unity, I imported the models, and almost exclusively applied emissive shaders which would allow both sides of the model to be rendered (most shaders will only render the back faces of models in Unity; because my models were shells or surfaces with no thickness I needed to figure out how to render both sides). I found that making the shaders emissive made the textures, and therefore the models, much more legible.

I am still very much a beginner in Unity, and I realize that if I were to develop this scene into a full game I would need to make a lot of changes. The scene currently has no colliders- you can fly right through all of the structures. Adding mesh colliders to the structures made the game way too laggy, since the scene contains millions of mesh faces. Regarding the player character, making this into a true drone simulator game would require me to map all the controls to a RC controller like an actual pilot would use; I don’t yet know enough about developing player controllers to make this a reality. I also need to research more about “reflection probing,” as I would like to tweak some things about the mirror/water surface.

With help from Dan Moore, I also explored this game in VR on the Vive. Very quickly I realized how nauseating the game was in this format- so for now VR is abandoned. I may revisit this in the future.

What’s next?

Moving forward, I would possibly like to explore tangible representations of the 3D models. Below is a rendering of a possible 3D print. I discovered that some of the models, due to the input footage capturing a 360 degree world, became vessel-like. I would like to create a print where the viewer can hold this little world in their hand, and peer inside to view the architecture.

I would also like to begin creating my own footage, using more stable drones which are better suited to videography. One possibility is to create a stereo rig from the knockoff GoPros, and film architecture in stereo 3D.


Gloeilamp-PlaceProposal

I have a couple ideas bouncing around for my place project-

  1. Trick Drone Photogrammetry. There is a growing “sport” of first-person-view drone trick flying, and an enormous amount of motion sickness inducing videos of pilots flipping around doing crazy maneuvers in a number of environments. My brother Johnny FPV is one of these pilots- I have been grabbing clips from his videos and processing them through PhotoScanPro to make really terrible 3D renderings of the spaces he flies in. These could manifest as an explorable virtual environment, or I could prepare them for digital fabrication.
  2. CNC+USB Microscope. I’d attach the USB Microscope to a custom tool holder on the CNC router, and set a toolpath for the microscope to travel along. I’d capture images at intervals along this path, and stitch them into an ultra high resolution image of any surface that could be placed on the router bed. Possible interesting subjects for exploration: an ant farm? soil samples? tin tiles? the palm of a hand?
  3. Photogrammetry in color infrared with Kodak aerochrome. I am leaning away from this idea as there isn’t a lot of foliage on the trees yet, and I’d like to take advantage of the way the film stock renders chlorophyll as magenta.

gloeilamp – Portrait


Stereo video, in Slitscanning and Time/Space Remapped views


Slitscanning as a visual effect has always fascinated me. Taking a standard video, slitscanning processes allow us to view motion and stillness across time in a completely new way. Moving objects lose their true shape, and instead take on a shape dictated by their movement in time. There is an immense history of this effect being taken advantage of by artists to create both still and moving works, but for my own explorations, I wanted to see the possibilities of slitscanning in stereo.

As an additional experiment, I processed the video not through a slitscanning effect, but through a time/space remapping effect. What happens when a video, taken as a volume, is viewed not along the XY plane (the normal viewing method), but along the plane represented by X and Time? This is a curious effect, but could it hold up in stereo video?

Stereo Slitscanning

Using the Sony Bloggie 3D camera, I captured a variety of shots. For Cdslls, I chose to isolate her in front of a black background, for simplicity’s sake. I first ran the video through code in Processing, which would create a traditional slitscanning effect. In order for the slitscanned video to hold up as a viewable stereo image, the slit needed to be along the X axis, so the same pixel slices were being taken from each side of the stereo video.  I output this slitscanned video into AfterEffects, where I composited it with a regular stereo video. *1

Time Remapping 

With a process for regular slitscanning in stereo achieved, I began to wonder about the possibilities for stereo video processed in other ways. Video, taken as a volume, is traditionally viewed along the X/Y plane where TIME acts as the Z dimension; every frame of the video is a step back in the Z dimension. But do we have to view from the X/Y plane all the time? How does a video appear when viewed along a different plane in this volume? Here I explore a sterographic video volume as viewed from the TOP, that is, along the X/TIME plane. *2

Code 

processing code for both the slitscanning and time remapping processes, using a sample video from archive.org (Prelinger Archives)

SlitscanVideoFINAL

spatioVideoFINAL


Display

For display, I chose to present the video in the Google Cardboard VR viewer. Using an app called Mobile VR Station, the two halves of the images are distorted in accordance with the Google Cardboard lenses, and fused into a single 3D image. The videos are also viewable on a normal computer screen, but this requires the viewer to cross their eyes and fuse the two halves themselves, which can be unpleasant and disorienting.

Thoughts

  1. I chose to do this kind of post production on the first video for a couple reasons- The output of the slitscanning, while pleasing in terms of movement, did not really create a 3D volume to my eyes in the way that the non-slitscanned video did. The two halves of the image would fuse, but it appeared almost as if the moving body was a 2D object moving inside the 3D space that the still elements of the video created. Through compositing the two videos together, the slitscanning would create a nice layer of movement deep back in 3D space, while the non-slitscanned portion would act as an understandable 3D volume in the foreground. I also refrained from applying the slitscanning effect to the tight portrait shot of Cdslls due to my hesitation with distorting her features. While slitscanning does create nice movements, it at times has an unfortunate “funhouse mirror” effect on faces, at times looking quite monstrous. This didn’t at all fit my impression of Cdslls, so I left her likeness unaltered on this layer.
  2. The way that my time remapping code operates currently, there are jumpcuts occuring every 450 frames- that is the height of the video. This is due to the way that I am remapping the time to the Y dimension- each frame of the video displays a single slice of pixels in the input video, so the top output row of pixels is the beginning of the clip and the bottom output row of pixels is the end of the clip. Once the “bottom” of the video volume is reached, it moves to the top of the next section of the video, thus creating the cut.

Moving Forward

One of the richest discoveries of these experiments has been seeing how moving and still elements of the input videos react differently to the slitscanning and time remapping processes. The “remapped time experiment 1” video shows this particularly well- still elements in the background were rendered as vertical lines, deep back in 3D space. This allowed a pleasing separation between these still elements, and the motion of the figure, which formed a distinguishable 3D form in the foreground. I would thus like to continue to film in larger environments, especially outdoors, which contain interest in both the foreground and the background.

I would also like to further refine the display method for these videos. Moving forward, I’ll embed the stereo metadata into the video file so that anyone with Google Cardboard or similar device will be able to view the videos straight out of YouTube.

Gloeilamp-PortraitPlan

For the portrait project I am working with cdsls. We were both completely mesmerized by the scanning electron microscope- Watching that image appear on the screen was some kind of magic- an object I thought I understood revealed itself in a completely unexpected way.

Here, I hope to leverage the novelty of slitscanning techniques to also reveal a known object in a satisfying and surprising way. The images below show my experiments so far with interactive slitscanning methods in Processing.

Moving forward, I want to capture cdsls with the Sony sterographic “bloggie” camera, process the video through slitscanning techniques, potentially moving through these videos with the interactive methods I have developed so far. The addition of stereo capture to this process will also allow for display through methods like Google Cardboard, which could further deepen the experience.

gloeilamp-SEM

I’ve had my pet Mali Uromastyx lizard, Typhius, for about ten years now. Uromastyx lizards may be mostly drab in color, but they certainly have interesting scales, so scanning some shed skin from my pet felt like a natural choice for the SEM. 

Even under a cheap cell phone macro lens, the scales look pretty neat:

For the sample, I chose a section of skin from near the base of Typhius’s tail. The scales there were pointy looking, but small enough that I had a hard time really examining their geometry. Even at the lowest magnification, in the first picture, the forms looked incredible and revealed some hidden features between the large scales; moving in to 80X and the minuscule surface texture of the scales themselves began to reveal itself!

An interesting feature of this second image is that there seems to be a “light” illuminating the inner geometries. Donna said this was probably due to the electron beam being caught bouncing around under some of the scales, thus increasing the exposure on the sensor and creating the illusion of an extra light source.

The third image shows the highest level of magnification that we looked at the scales under- 450X. At this level, the tiniest surface textures become jagged and rough, going so far as to even reveal the edges of the individual cells! How incredible- this tiny piece of shed skin has revealed itself as an immense alien landscape.